
Your Benchmark Universe Resource Library consists of a series of resources and materials organized by program or series. The resources you have access to are determined by your district and/or school’s subscriptions.
You can use the library to filter, search, view, and customize book titles. Use the School and District Customization bookshelves to share your favorite eBook customizations with your colleagues. You can also add materials to bookshelves and assignments or do book reviews, all in one place!
The different libraries have the same functionality but offer a few unique characteristics, such as filter types. Use the library-specific filters on the filter panel to get the materials you want. Materials are organized in your libraries based on the program and filters selected.
Library at a Glance
| Library Legend | Description |
|---|---|
|
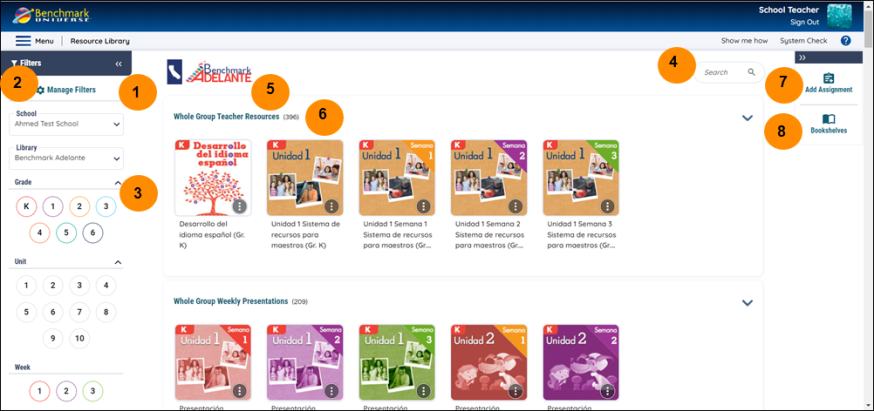
1. Library list |
Use the dropdown list to choose a different library, if available. It’s possible to favorite and set a default library in the dropdown. See here for more info. Note: You will only see the libraries that your district has subscribed to. |
|
2. Manage Filters |
Open the Manage Filters modal. Use the Manage Filters modal to set your default filters, as well as the filters of your students. |
| 3. Filters panel |
Each library has its own unique set of filters. Use the filter buttons to set or clear the filters applied to your library. The filter buttons act as toggle keys and change color when selected. Some libraries include an All Filters button at the bottom of the filters panel. Use this button to further filter your resource results. Note: Filter options in any library may be added, removed, or changed without notice, and may differ from those listed here. |
| 4. Search bar | Search resources by title or keyword. Click the Search bar to expand it. |
| 5. Filters bar | View the filters you have applied to your library, delete filters, or use the Clear Filters button to clear all filters. |
| 6. Materials display area, More Options icon, Expand and Collapse buttons, and Customization icon |
Use the Materials display area to:
Note: My Library titles which contain a customization are denoted by a customization icon under the thumbnail.
|
| 7. Assignments | View, edit, and add assignments. |
| 8. Bookshelves | View, access, and add bookshelves to your library. Here you can also access the School and District Customization bookshelves, where you can view, add, and share customizations with other teachers and administrators in your school or district. |
Last Updated: July 22, 2022